 Forefront
How to Create (or Modify) a Custom Assessment
Build an assessment in the assessment editor: questions, question types, standards, proficiency, and the overall score.
This requires the Basic or Premium plans’ assessment builder functionality. (Understand the plans here.)
Components of an Assessment
An assessment is built in the assessment editor, one tab at a time:
Structure: The questions, and the assessment’s overall score. This is where most of the work happens.
Instructions: Directions for the whole assessment, which teachers see when they give it.
Documents: Documents, PDFs and links that belong to the assessment as a whole. (Files for a single question are added on that question.)
Course Association, Class Assignments and Data (district assessments only): Which courses and classes use the assessment, and the data entered so far.
Import: Bring scores in from a file.
Settings: When an assessment counts as complete, whether it contributes to standards calculations, and whether it can be opened in the interview tool.
The assessment’s name is at the top of the page; click it to rename the assessment. The ⋮ menu beside it has Clone, Rename, Move, Modify Appearance, Public and Delete.
Create an Assessment
Open Resources in the left-side navigation. Resources are organised in folders that hold assessments, printable documents, saved reports and more. If you don’t have District Catalog Write access, create the assessment in your own user folder.
Click New and choose Create Assessment. Create Folder is in the same menu, so you can build a folder structure that suits your district, school or own assessments.
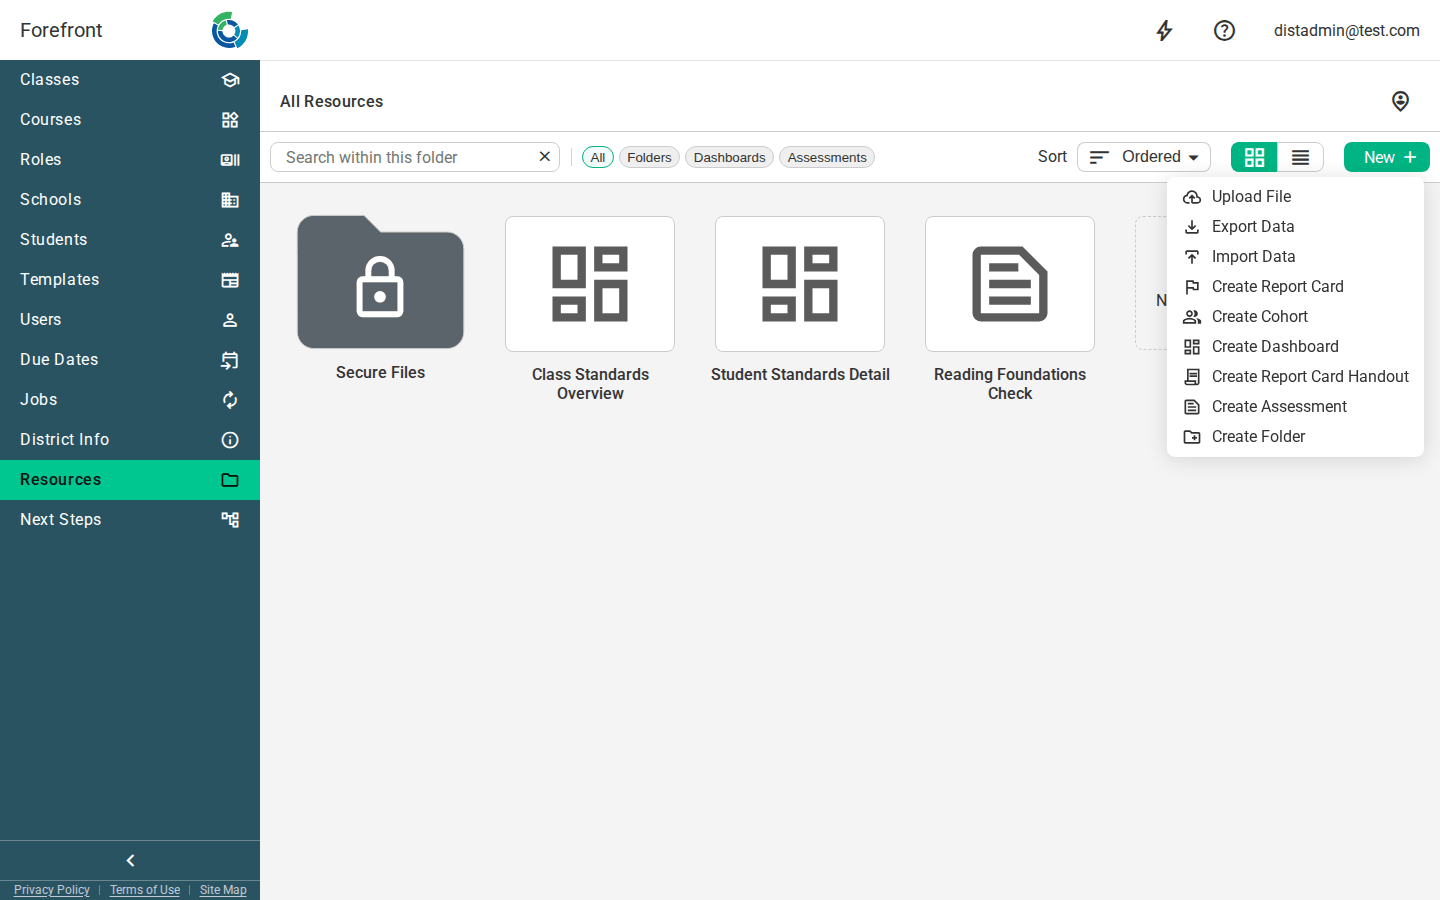
The new assessment opens in the editor as Untitled Assessment, with one question and an overall score ready to fill in. To change an existing assessment, open it from Resources. If you can edit it, it opens straight into the editor.
Changes save as you go. There is no Save button: each edit is saved a moment after you make it.
Building Assessments
Follow these steps to configure an assessment.
1. Name the assessment.
Click Untitled Assessment at the top of the page and type a name. A clear naming system helps everyone find assessments later.
2. Add questions.
On the Structure tab, click + Add Question until the assessment has the right number of questions. A new question is named “New Question”, scored 0–2, and starts with proficiency bands already set.
The strip across the top of the tab is how you move around the assessment. Overview comes first, then one pill per question. Click a question’s pill to edit it, and Overview to get back to the whole assessment. On a long assessment, not every pill fits in the strip. Use the Jump to question button, the ⋯ (three dots) at the end of the strip, to open a list of every question. Type a question’s index or name in the search box to narrow the list, then click the question to open it.
3. Give each question an index and a name.
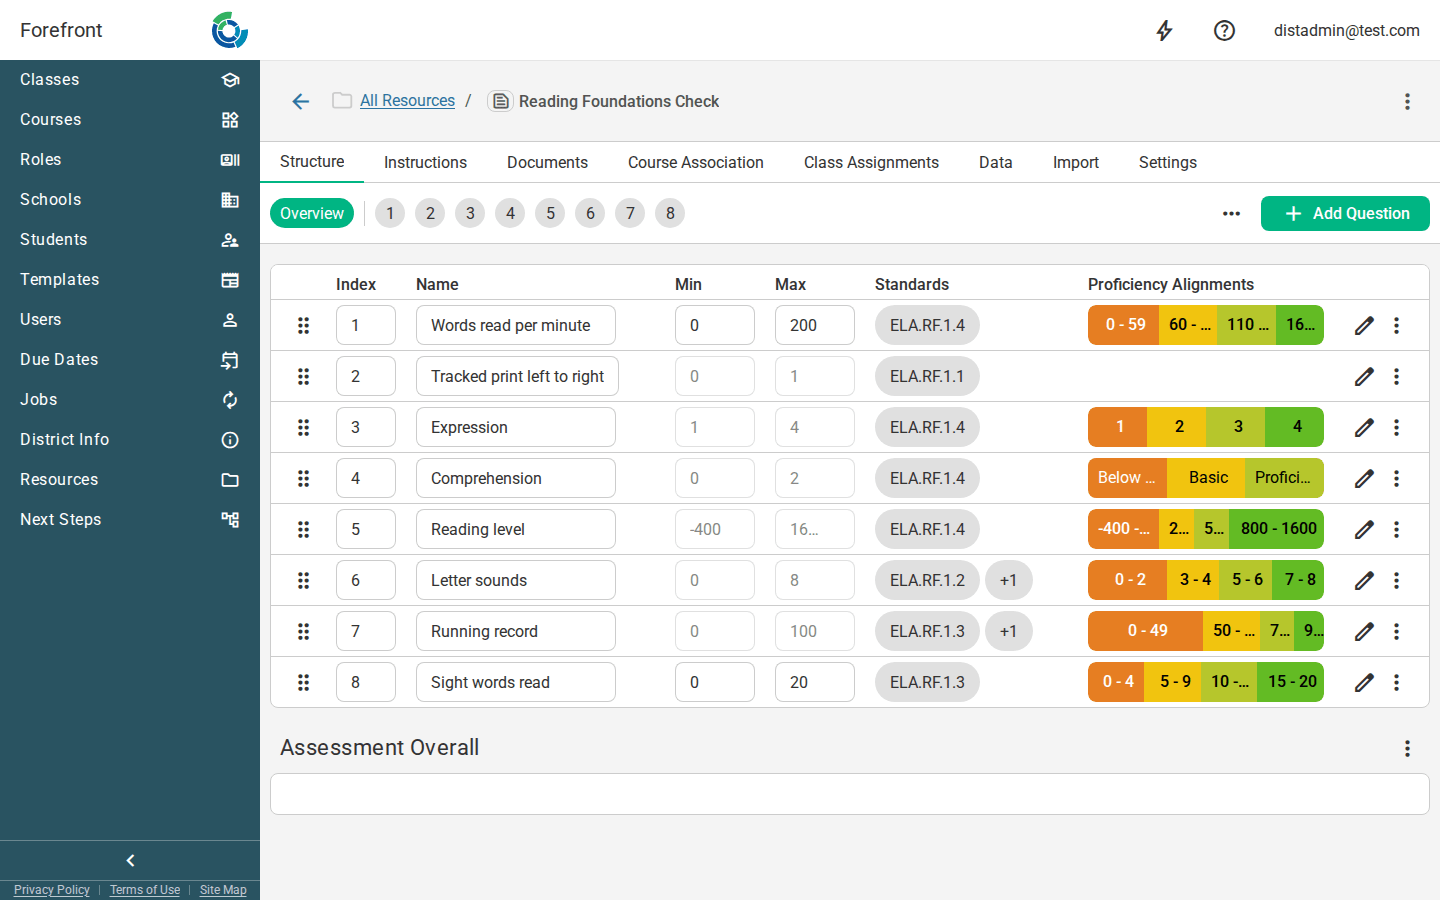
Index: The label teachers see at the top of the data entry spreadsheet. It can be a number, letters or a mix: 1, 1a and 1b, or NWF for nonsense word fluency.
Name: A short phrase that says what the question is about, such as “Facts within 20” or “Fluency on the Passage”. Names appear in the body of evidence and in reports. Don’t copy the question out word for word unless it’s short; the full text goes in the question’s Question Text.
Edit both in the Overview table, or on the selected question’s pill (click the index or the name, or use the pencil).
To reorder questions, drag a row on the Overview by its handle, or use Move Up / Move Down from the row’s ⋮ menu (also on right-click). The same menu has Clone Question, Copy Question / Paste From Clipboard and Delete Question.
A question can’t be deleted if it’s the only one, or if a calculated question still uses it. Change that question’s formula first.
4. Choose each question’s type and scoring.
Click a question’s pill, or the pencil on its Overview row, to open it.
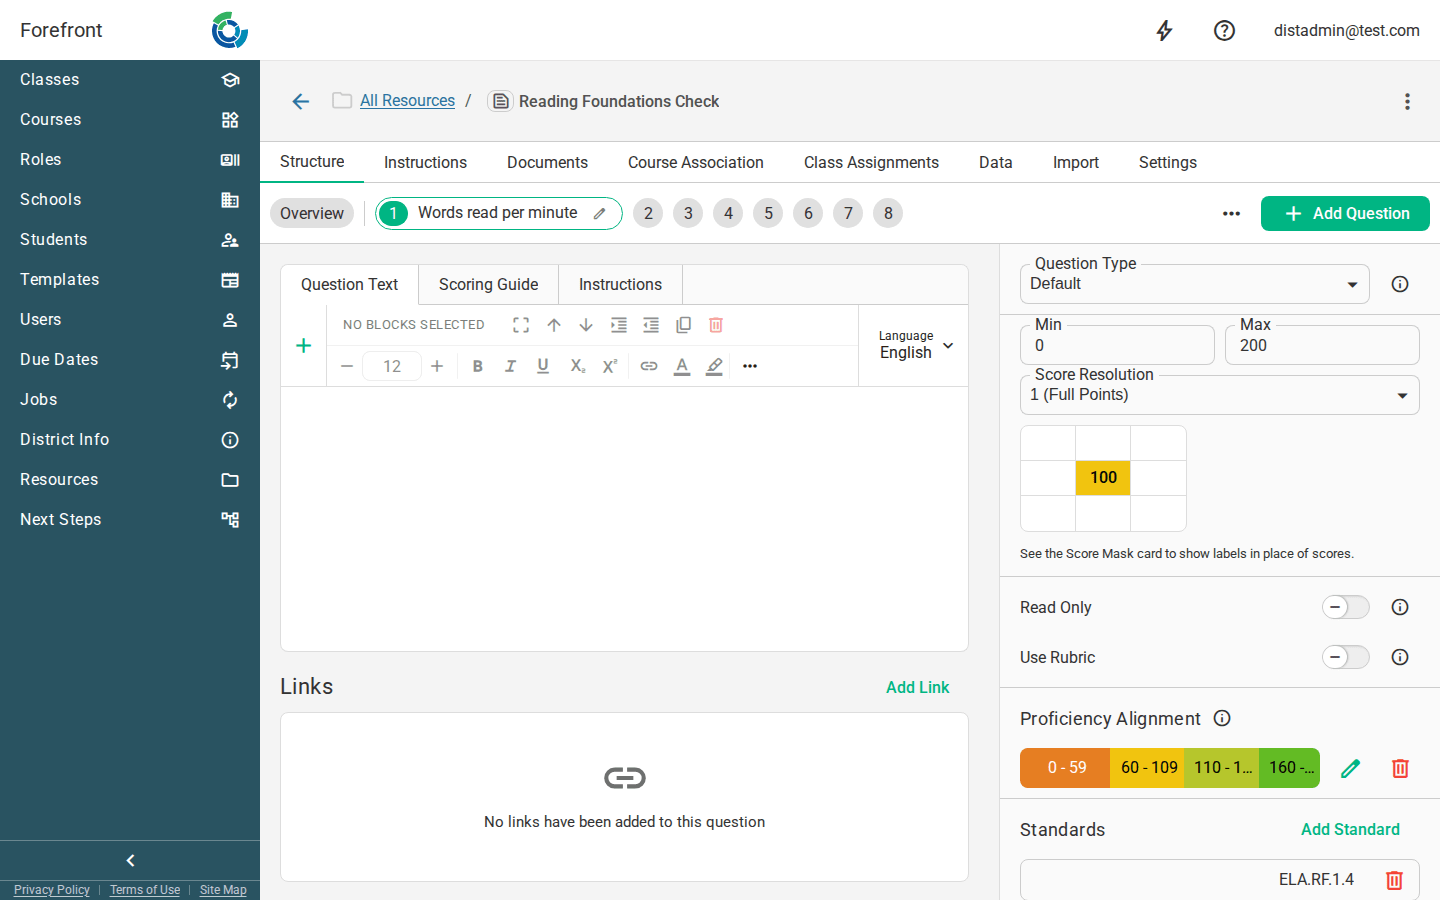
Question Type sets how a question is entered and scored. Most questions are Default: the teacher types a score.
| Question Type | The teacher… |
|---|---|
| Default | types a score |
| Checkbox | checks a box |
| Checklist | marks a list of items (sounds, words, steps) and Forefront works out the score |
| Star rating | taps a row of stars |
| Proficiency | picks a proficiency level |
| Measure (Lexile/Quantile) | types a Lexile or Quantile measure |
| Tally marks | adds a mark at a time |
| Calculated | enters nothing: the score is worked out from other questions |
Question Types explains each type and when to use it. The settings under Question Type change with the type, and a preview shows how the question will look in the spreadsheet.
For a Default question, set:
- Min and Max: The score range. Most questions start at 0.
- Score Resolution: The smallest step a score can take, such as 1 (Full Points) or 0.5 (Half Points).
Two settings work with most types:
- Read Only: For scores that come from somewhere else, usually a data import. Teachers can see these scores but can’t enter or change them.
- Use Rubric: The teacher chooses a score from a written descriptor for each level, instead of typing it. A Rubric card appears where you write the descriptors. This is especially useful for interview and observational assessments.
Changing the type of a question that is already set up can change its score range, proficiency bands or score mask. When it would, Forefront lists exactly what will change and asks before switching.
5. Align standards.
In the question’s Standards card, click Add Standard to search for a standard by code or browse the list. A question can align to more than one standard, from the same or different standard systems.
Standards alignment at the question level is critical to Forefront functionality, and should be done with care. A question with no standards doesn’t reach proficiency reports. Aligning a question to both a standard and its higher-level cluster is redundant.
6. Define proficiency for questions and the overall assessment.
Setting performance alignments, sometimes called cutoff scores or proficiency bands, correctly is important for accurately assessing student competency.
6a. Question Level Alignments
A question’s Proficiency Alignment maps its scores onto up to five proficiency levels, so a raw score also reads as a level in reports and the gradebook. This defines proficiency at the question and standard level.
To edit the bands, click the pencil beside the alignment, or click the alignment itself in the Overview table. If a question has none, Enable Proficiency Alignment adds them. A Proficiency question has no alignment, because the level the teacher picks is already the band.
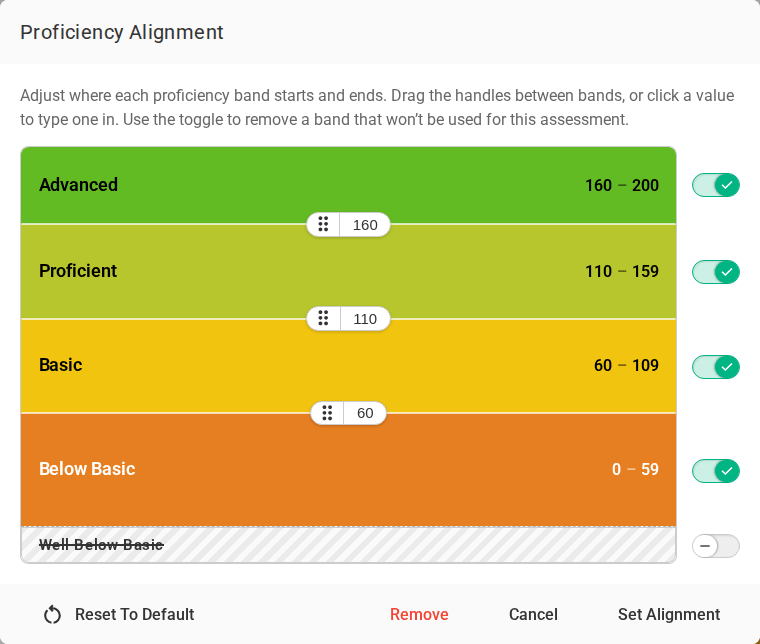
The bands are stacked with the highest level at the top. Each one shows the range of scores it covers.
- Choose which bands to use. The toggle beside each band turns it on or off. Turn off a level this question doesn’t need, for example Well Below Basic on a short scale. At least one band must stay on, so the last band’s toggle can’t be turned off. A question also can’t have more bands than it has possible scores: a 0–2 question has room for three. Turning a band on or off spreads the bands evenly again, so set your toggles before you adjust the cutoffs.
- Drag a handle to move a cutoff. Between each pair of bands is a handle ( ). Drag it up or down to move the line between the two bands. The bands on either side grow and shrink, and the scores snap to the question’s Score Resolution.
- Type an exact cutoff. The number next to each handle is the score where the band above begins. Click it, type a score, and press Enter (or Escape to cancel). A cutoff can’t pass the cutoffs on either side of it, so a band always keeps at least one score.
- Use the keyboard. Tab to a handle, then use the arrow keys to move it one step, Page Up / Page Down to move it further, and Enter to type a value.
Reset To Default turns the standard bands back on and spreads them evenly across the score range. Remove clears the question’s alignment entirely. Nothing changes until you click Set Alignment. Cancel closes the window and keeps the bands as they were.
6b. Overall Proficiency Alignment
The Assessment Overall section sits under the questions on the Overview. It defines proficiency in reports where assessment overalls are visualized. Click its alignment to edit the bands in the same window as a question’s, or use Add Proficiency Alignment if it has none.
You do not need an overall. If it doesn’t make sense for your assessment, choose Remove Overall from the section’s ⋮ menu. The same menu adds an overall back, and can override how the overall is calculated or how it contributes to standards. This article (about Bridges Third edition) explains the downsides/inaccuracies an overall can cause.
7. Add question text and resources (optional).
None of these are required, but they help teachers give the assessment and help everyone read the data later:
- Question Text, Scoring Guide and Instructions: Tabs above the question’s editor, with headings, lists, tables, images, links and equations. Question text is shown in the data entry spreadsheet and in reports.
- Language: Question text can be written in more than one language. Use the Language menu on the Question Text toolbar to Add language or remove one.
- Links and Files: Resources for this question, such as activities or scoring guidance. Use the Documents tab for anything that belongs to the whole assessment.
- Score Mask (Default questions): Shows a label in place of a score, so a teacher can enter “A” instead of 4. Turn it on with Enable Score Mask.
8. Link Next Steps (optional).
If your district has the Next Steps library, a question can be linked to the activities that support it. Open the question and find the Next Steps card. Use Link to search the library and attach an existing activity, or Create to write a new one without leaving the assessment. Linked activities are listed underneath, and each can be removed from the question the same way.
Linking requires District Catalog Write access. It also works on assessments you cannot edit — a Forefront-published screener, for example — so your district can attach its own materials to them. For those, open the assessment itself rather than the editor, and expand the question to find the same section.
An activity created here is saved in your district’s Next Steps library and starts unpublished, so teachers cannot see it yet. Finish writing it and publish it when it is ready.
Once linked, teachers reach the activity from the question’s cell in the data entry spreadsheet and from the question detail window in reports. Read more about how teachers access Next Steps.
Editing Together
Only one person can edit an assessment at a time. If someone else is already editing it, a banner at the top says who, and your view is read-only: you can still move between tabs and questions, but not change anything. If you need to make a change, Take Over Editing gives you control. The other person’s view then becomes read-only.
The chip in the top bar shows who else has the assessment open.
Adding Assessment to a Class
Read here for how teachers can add an assessment to their class.
Adding Assessment to District Courses
Once your assessment is built, open its Course Association tab. Choose the Course, Curriculum, Program and Part, then click Add To Course. The Curriculum Editor shows and arranges every assessment in a course’s curriculum.
Need more support?
Submit a support request or email our team at support@forefront.education.